WordPress has a set of coding standards that you can use when you develop either plugins or themes. While it’s not mandatory, I highly recommend using it on your project. It will make your code more user friendly and relatively easy to maintain in the long run.
I was a Windows user for a long time and recently switched to Ubuntu 20. When I tried to install WordPress Coding Standards, I struggled a few times since I’m new to the Linux OS. In this tutorial, I will show you step by step on how I did it on my end and hoping that this will help you out.
First requirement: composer. I’m using this throughout my installation. You can check their documentation on how you install it in your system.
Installation steps:
- Install PHP_CodeSniffer – This is the script that is responsible for tokenization of the PHP, CSS and Javascript code on your project that detects any code violation from the defined standard. By using a terminal in Linux, cd to your home directory and install PHP_CodeSniffer.
$ cd ~/
$ composer global require "squizlabs/php_codesniffer=*"- Download WordPress Coding Standard – In my case, I would prefer to install this globally instead of per project. Make sure that you are still in your home directory in your terminal before starting. Executing the code below will clone the repository and rename it wpcs.
$ git clone -b master https://github.com/WordPress/WordPress-Coding-Standards.git wpcs- After you have downloaded the WordPress Coding Standard, we need to set this on your local path. Now this is the part where I have struggled before so make sure you follow exactly to avoid the mistakes I’ve made.
$ sudo phpcs --config-set installed_paths /home/username/wpcsNoticed the username? That would be the username of your current account. You should see this path when you go to Files -> Home, then press CTRL + L. You can verify if you have working sniffers by using phpcs -i.

After you have confirmed that WordPress Coding Standard is added to your setup, we can now install the extensions we need for the Visual Studio Code. There are tons of similar extensions that are currently available, but these are the extensions that I am using and proven to be working.
Phpcbf by Per Soderlind and phpcs by Ioannis Kappas
Installations of these extensions are pretty much straightforward. Once you have done that, we are going to configure the settings. I would personally recommend that we set this up globally instead of per workspace. This will save you repetitive configuration, however if you prefer per workspace setup, you can copy the same settings from below as well.
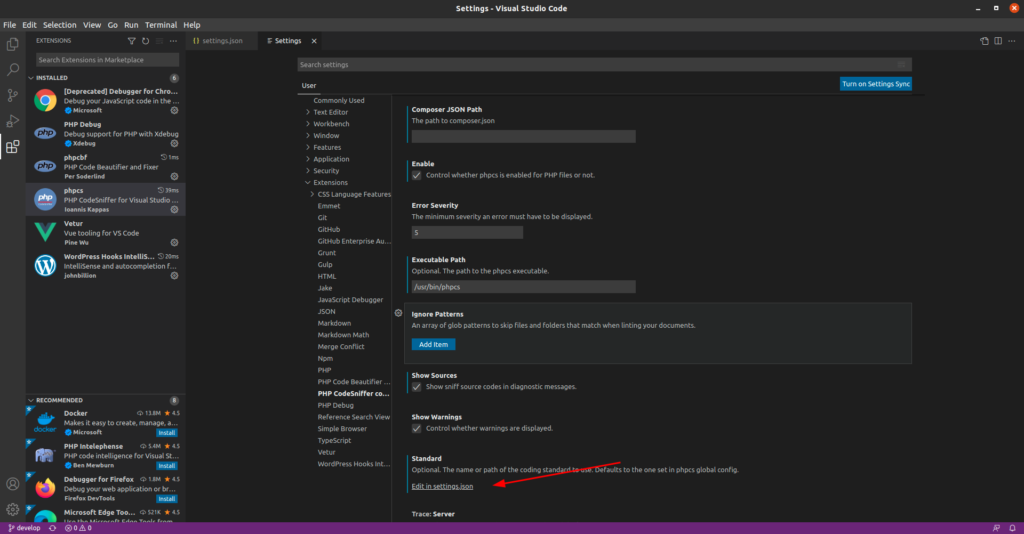
Restart your Visual Code Editor, then go to File -> Preferences -> Settings -> Extensions -> PHP CodeSniffer configuration. Scroll down a bit until you see Edit in settings.json as shown below.

Click that link and add the following:
{
   "phpcs.enable": true,
   "phpcs.executablePath": "/path/to/phpcs",
   "phpcs.standard": "WordPress",
   "phpcbf.enable": true,
   "phpcbf.documentFormattingProvider": true,
   "phpcbf.onsave": true,
   "phpcbf.executablePath": "/path/to/phpcbf",
   "phpcbf.standard": "WordPress",
   "phpcs.showSources": true,
}
Now, open a terminal then go to your home directory then we need to determine the paths for phpcbf and phpcf that we need for the configuration.
$ cd ~/
$ which phpcs
$ which phpcbf
Copy the path of both tools and put them on the executablePath value respectively. Save and restart your Visual Code Editor. By this moment, you should be able to have the tools working. Open a sample PHP file and add your code, then when you click CTRL + S, it will sniff your code by default and phpcbf will auto format your code.
Let me know in the comment section if you find this tutorial useful or if you have any questions.
Happy coding!

Leave a Reply